Ask any pilot and they will tell you that experience is your best asset. Mistakes are the harshest but best teachers. But since few of us have infinitely deep pockets, and we value people and property, a simulator is a great way to have your first few mistakes. There are a few great simulators that use actual transmitter style inputs for ma realistic feel. There are others that let you use your own transmitter with a plug or adapter to connect to the computer. This is the best option since it is the transmitter with the exact weight and feel and switch arrangement that you fly with.
Click here for one example, Phoenix Flight simulator lets you fly a number of RC aircraft including Drones/Quadcopters/Multirotors.
We hope to test some of these in the near future and give you the full rundown on them.
But say you want to try something for free (yes, your ears perked up there) There are a number of free Drone flight simulators on the Goggle Play store for Android users (phones and tablets).
Now bear in mind that you do not get the feel of the transmitter, The feedback of feeling where the centrepoint of the controls is missing since you are sliding thumbs on a glass screen. All the same, you DO get to see and understand what your inputs do under various conditions.
Here are the ones we tried:
Quadcopter Flight Simulator.
+ Good Graphics.
+ Ground and FPV viewpoints.
+ Has many features like Alt Hold, and Auto Return.
- You have to pay for more drones and locations.
3D Drone Flight Simulator:
+ Cute graphics.
- It's just a game, a basic game
- Mode 1 only
Quadcopter Simulator:
+ OK Graphics.
- Could not get it into English mode
- Does not appear to be mode 2.
- This is another game, not a simulator.
- I had to restart my tablet to exit.
RC Land Free:
+ OK Graphics.
+ Not entirely unrealistic control responses.
+ Fun Challenges
- Still gamelike.
Indoor Heli Sim:
+ Realistic controls.
+ some decent options for control sensitivity
- Very limited selection of aircraft.
- Graphics are VERY basic.
RC Quadcopter Park Simulator:
+ OK Graphics.
- Just a very basic game.
- Completely unrealistic controls.
That's the freebies we tried. From experience, flying without actual spring loaded joysticks is never going to give you the true feel of the real thing, But it can give yous some practice on those 'no fly' days when the weather is too bad or you are waiting for that critical part in the mail.
Sunday, March 8, 2015

Saturday, March 7, 2015
Cheerson CX20 Camera mounting
Here we install the SJ4000 camera. It's a GoPro like camera and is an affordable alternative.
In this installment, we are using a combination of the camera mount that comes with the CX20 and part of the massive array of mounting options that come with the SJ4000.
 First off, There is a fine steel cable that comes with the camera. I call this a 'no cry' cable. In case of various events, you should not lose the camera. I attach one end through the bolt for the landing skid.
 The Cheerson camera plate (and the aftermarket units) come with rubber antivibration mounts. Connect the plates together BEFORE you try and attach the plates to the Quadcopter. The camera has to be mounted in the protective housing. There are no mounting points directly on the camera itself. Remove the mounting foot and use the CX20's mounting foot (the while plastic part attached below the camera).
Before you attach the plate to the CX20, attach the white mounting foot to the plate. Attach the plates to the bottom of the CX20. with the 2 screws.
Thread the 'no cry' cable through the plate furthest from the CX20. Loop the other end through the other landing skid mount. If the rubber grommets fail, the camera will not leave the quad, and you won't cry about losing the camera.

 So now we are all set. We can take video from the air. You tell the camera to start filming, then take off. In this simple setup, you do not have control of the camera in flight. You also have to either take the camera out and hook it up to the computer or take the memory card out and put that in your computer. If you opted for the SJ5000, it has WiFi and you can transmit to your phone or tablet.
If you want to want total control of the camera from the air, you will be better off with a GoPro or a gimbal mount. (stay tuned for our extended blog on that)
 The Cheerson camera holder is meant for a thinner camera. The SJ4000 is 4mm too thick to fit.
Update. Upon examining the screws that hold the foot to the anti vibration mount, the threads are barely touching the nylon inserts that keep the screws from loosening. A little thread lock compound resolved that, and just to hedge the bet, I took one end of the metal cable (the 'No cry' strap) and threaded it in the camera foot. This way if the plate were to pull from the grommets OR the foot came unscrewed from the plate, the cable would save all.
In this installment, we are using a combination of the camera mount that comes with the CX20 and part of the massive array of mounting options that come with the SJ4000.
Before you attach the plate to the CX20, attach the white mounting foot to the plate. Attach the plates to the bottom of the CX20. with the 2 screws.
Thread the 'no cry' cable through the plate furthest from the CX20. Loop the other end through the other landing skid mount. If the rubber grommets fail, the camera will not leave the quad, and you won't cry about losing the camera.
If you want to want total control of the camera from the air, you will be better off with a GoPro or a gimbal mount. (stay tuned for our extended blog on that)
Now in case you are wondering why we did not use the rest of the camera mount that came with the CX20..........
Update. Upon examining the screws that hold the foot to the anti vibration mount, the threads are barely touching the nylon inserts that keep the screws from loosening. A little thread lock compound resolved that, and just to hedge the bet, I took one end of the metal cable (the 'No cry' strap) and threaded it in the camera foot. This way if the plate were to pull from the grommets OR the foot came unscrewed from the plate, the cable would save all.
Cheerson CX20 testing and modding
Our long term testing of the CX20 continues.
This entry, we have had some very good flights.... and one scary moment. The CX20 is very responsive. Many have found that gently taking off can often lead to a 'tip over'. Most suggest giving it a leap into the sky and throttling back to where you want. This sounds far more dramatic than it really is. That being said, if you pay attention, you can readily take off gently, just pay attention if it starts leaning.
Flying the CX 20 in the different modes is interesting, The 'headless' mode (it will go away from you or directly to you. Based on where the motors were armed. regardless of which way it is pointing). It can be easier, but if you are trying to fly by what way it's pointing, you can get messed up. Altitude hold means it will try and keep the same altitude while you fly whatever direction you like. I tried hover which is a position lock, It is supposed to stay exactly where it was when you engaged that mode. If you are moving or not completely still, it can go awry.
Just to see how responsive the CX 20 is, I got it in a comfy hover, then slammed the throttle to full. It rocketed straight up at an astounding rate.
We have also started testing flight times.
With the stock battery (2700Mah), and no accessories attached, Flight time was a solid 15 minutes.
With the 3200Mah battery, we measured a 17 and half minute flight.
With the SJ4000 Camera attached using the fixed base, we only lost 3 minutes of flight time off of each battery. That's not bad. It still rockets upward when told to but slightly slower. When we use the gimbal mount, it should give us a good idea what you can expect.
When choosing a gimbal, weight is a huge factor. These craft literally hang on the propellers. More weight cuts into handling and endurance far more quickly than on a fixed wing aircraft. And when the battery gets low LAND, don't push for that extra minute of flight time of you are just setting yourself up for some repairs at the very least. One Youtube video showed a pilot with hiw quad up about 80 metres (around 250 feet). He kept flying and flying after the low battery warning came on. Finally it just dropped like a stone. The damage looked like a complete write off.
As we add accessories, flight times will continue to be checked to compare how much these items affect duration.
NOTE: there is a big update to this. Skip to the end of this article to see details.
Of the accessories we are adding, a 433Mhz telemetry module is the first added. Most people run the wires through one of the holes in the hull and attach the telemetry transmitter to the outside of the craft. We opted for an internal mount. It looks cleaner and compared to the usual external mount, it's not harder to do.
First off. look at the space inside. To help minimize the chance of interference with the radio control, the opposite side from the antennas was chosen. You can see how small the transmitter is on the desk to the right.


 Triple check, the antenna is in a good place and doesn't interfere with the landing skid.

 The size of the antenna base is carefully measured. 15/64th of an inch makes for a tight fit. Drill the hole from the inside to out. That way when the bit penetrates, it will not damage internal components.


 The location works great. The antenna is oriented to swing back. A bit of hot glue around the transmitter inside gives a little more strength. Probably not needed but a little strength isn't a bad thing if it doesn't add much weight.
 Now it's time to get to the surgical part of this exercise. Snip the Zip tie that secures the cap of the FC.
 The lid snaps off with little effort. Don't lose the foam underneath. It moderates the air to the barometer/altimeter.
 To avoid removing (and possibly mis locating) the wires into the FC, a clamp holds the circuit board at a better angle to work on it.
 for this part, you have to make sure you are connecting the correct wires to the right points on the board. This is some delicate soldering. If you don't have the skills or the right tools, it's worth it to find and pay someone who is good with this fine work.
 put the board back to the position it was in before. Make sure the foam is covering the barometer again before you close the case. I used side cutters to nibble off a small section of the case right below where the USB connecter plugs in to allow for the wires.
 I bared a section of the output signal wire and spliced in an extra wire (white) for later. Don't forget to put a new Zapstrap on the case for the FC.
 Everything looks neat and in place.
 The antenna fits perfectly and doesn't get in the way.
Close her up and you are set.
STOP THE PRESSES !!!!!!
There are several series of the CX20 (And Quantum Nova), and many of them use slightly different hardware. Getting the telemetry to work on our testbed didn't work, (there have been a few things that stubbornly defied us) but Jordan Worley in one of the Quadcopter groups on Facebook dug in deep and got to the heart of the matter. There have been a few well intentioned articles on getting telemetry installed on the CX20/Quantum Nova series and he uncovered some things that explain a lot. Many of the previous articles are incorrect or incomplete. Here is his revised version that is making it work for people
Telemetry mod
And if you haven't joined already, this Facebook group is a great and fun loving bunch that freely share knowledge and tips to grow this hobby.
Facebook Link
Do you remember that white wire We spliced in?
In an upcoming entry we will be adding 2 video systems. One will be a gimbal mounted camera and that will stream video to our groundstation. Our setup will be a laptop computer. The Telemetry transmitter sends it's signal to a USB receiver so that it can display the information (if desired) on any video transmitted and recorded.
A second, lightweight fixed FPV camera will be mounted and the white wire will give the same data to the flight display.
When doing camera work, the operator can get disoriented with the camera tilting and moving. The fixed camera makes sure you have a fixed point or reference while angling the filming camera.
This entry, we have had some very good flights.... and one scary moment. The CX20 is very responsive. Many have found that gently taking off can often lead to a 'tip over'. Most suggest giving it a leap into the sky and throttling back to where you want. This sounds far more dramatic than it really is. That being said, if you pay attention, you can readily take off gently, just pay attention if it starts leaning.
Flying the CX 20 in the different modes is interesting, The 'headless' mode (it will go away from you or directly to you. Based on where the motors were armed. regardless of which way it is pointing). It can be easier, but if you are trying to fly by what way it's pointing, you can get messed up. Altitude hold means it will try and keep the same altitude while you fly whatever direction you like. I tried hover which is a position lock, It is supposed to stay exactly where it was when you engaged that mode. If you are moving or not completely still, it can go awry.
Just to see how responsive the CX 20 is, I got it in a comfy hover, then slammed the throttle to full. It rocketed straight up at an astounding rate.
We have also started testing flight times.
With the stock battery (2700Mah), and no accessories attached, Flight time was a solid 15 minutes.
With the 3200Mah battery, we measured a 17 and half minute flight.
With the SJ4000 Camera attached using the fixed base, we only lost 3 minutes of flight time off of each battery. That's not bad. It still rockets upward when told to but slightly slower. When we use the gimbal mount, it should give us a good idea what you can expect.
When choosing a gimbal, weight is a huge factor. These craft literally hang on the propellers. More weight cuts into handling and endurance far more quickly than on a fixed wing aircraft. And when the battery gets low LAND, don't push for that extra minute of flight time of you are just setting yourself up for some repairs at the very least. One Youtube video showed a pilot with hiw quad up about 80 metres (around 250 feet). He kept flying and flying after the low battery warning came on. Finally it just dropped like a stone. The damage looked like a complete write off.
As we add accessories, flight times will continue to be checked to compare how much these items affect duration.
NOTE: there is a big update to this. Skip to the end of this article to see details.
Of the accessories we are adding, a 433Mhz telemetry module is the first added. Most people run the wires through one of the holes in the hull and attach the telemetry transmitter to the outside of the craft. We opted for an internal mount. It looks cleaner and compared to the usual external mount, it's not harder to do.
First off. look at the space inside. To help minimize the chance of interference with the radio control, the opposite side from the antennas was chosen. You can see how small the transmitter is on the desk to the right.
There is plenty of space here and it does not interfere with any of the electronics.
Close her up and you are set.
STOP THE PRESSES !!!!!!
There are several series of the CX20 (And Quantum Nova), and many of them use slightly different hardware. Getting the telemetry to work on our testbed didn't work, (there have been a few things that stubbornly defied us) but Jordan Worley in one of the Quadcopter groups on Facebook dug in deep and got to the heart of the matter. There have been a few well intentioned articles on getting telemetry installed on the CX20/Quantum Nova series and he uncovered some things that explain a lot. Many of the previous articles are incorrect or incomplete. Here is his revised version that is making it work for people
Telemetry mod
And if you haven't joined already, this Facebook group is a great and fun loving bunch that freely share knowledge and tips to grow this hobby.
Facebook Link
Do you remember that white wire We spliced in?
In an upcoming entry we will be adding 2 video systems. One will be a gimbal mounted camera and that will stream video to our groundstation. Our setup will be a laptop computer. The Telemetry transmitter sends it's signal to a USB receiver so that it can display the information (if desired) on any video transmitted and recorded.
A second, lightweight fixed FPV camera will be mounted and the white wire will give the same data to the flight display.
When doing camera work, the operator can get disoriented with the camera tilting and moving. The fixed camera makes sure you have a fixed point or reference while angling the filming camera.
Wednesday, March 4, 2015
Cheerson CX20 Continued, Part 2 of 3
So we had the CX20 all assembled and everything checked out but we could not get it to take off. It was spinning the props but not fast enough. After scratching our heads and bugging a whole bunch of people, Joe at Rotorporn said he knew exactly what the problem was. In a matter of 15 minutes, he had the software corrected and sorted out. He really knows the system well, and if you can't figure something out. I strongly suggest you get a hold of him. He charges quite reasonable rates and for all that he did, even after it was flying, i can tell you it was a bargain. Sure the system should have worked right out of the box. But sometimes when you get a less expensive model, there can be some tinkering. The Multirotor/drone market is still very young and few units, even the super high quality models like the Yuneec Q500 Typhoon are rarely 100% right out of the box. The less the price, the more likely that there will be some tinkering. The Cheerson CX20 is one of the most affordable quadcopters with it's particular built in capabilities (and upgradabilities).
And by the way, Joe at Rotorporn also tells me that they do a lot of salvaging with customers. When they have crashed one too many times or outgrown their drone's capabilities, Joe helps take what components are still good and builds you a newer unit. Like a phoenix rising from the ashes, yours could have a second (or more) life. Here is a CX20 he rebuilt into a 450mm frame. Apparently it flies much better. https://www.youtube.com/channel/UCUZbbtUMiKgkSjNidjkVuZA
If you are on Facebook: https://www.facebook.com/pages/RotorPorn/650980798341816
We will be posting more to do with the CX20 as well as some videos of it. (and some goofy pictures taken during the downtime) soon.
And by the way, Joe at Rotorporn also tells me that they do a lot of salvaging with customers. When they have crashed one too many times or outgrown their drone's capabilities, Joe helps take what components are still good and builds you a newer unit. Like a phoenix rising from the ashes, yours could have a second (or more) life. Here is a CX20 he rebuilt into a 450mm frame. Apparently it flies much better. https://www.youtube.com/channel/UCUZbbtUMiKgkSjNidjkVuZA
If you are on Facebook: https://www.facebook.com/pages/RotorPorn/650980798341816
We will be posting more to do with the CX20 as well as some videos of it. (and some goofy pictures taken during the downtime) soon.
Thursday, February 26, 2015
Still working on the CX20
We are still working on giving you more on our ongoing review of the Cheerson CX20.
In the mean time, this gem came across our desk and we have to share it with you:
World’s first portable Auto-follow & FPV Drone, routes flights, one key take off & landing, auto return, full carbon fiber material cast & sports car dynamics and texture, Designed for sports enthusiasts, outdoor fans and indie moviemakers, put it in your bag and enjoy your wonderful life now.
When we get our hands on one, we will offer a full review. It looks like a very nice and very complete unit. Foldable arms, 'follow me' mode and smartphone connection.
In the mean time, this gem came across our desk and we have to share it with you:
World’s first portable Auto-follow & FPV Drone, routes flights, one key take off & landing, auto return, full carbon fiber material cast & sports car dynamics and texture, Designed for sports enthusiasts, outdoor fans and indie moviemakers, put it in your bag and enjoy your wonderful life now.
When we get our hands on one, we will offer a full review. It looks like a very nice and very complete unit. Foldable arms, 'follow me' mode and smartphone connection.
Friday, February 20, 2015
Review in progress Cheerson CX20
Also known as the Quantum Nova, and various other names. This is one of the most successful Phantom clones on the market in its various forms. There are more people rebranding this with slight variations than you can shake a stick at.
This is a GPS equipped full featured unit that can do almost anything including autopilot flight. You can use the Mission Planner software and use it for automated areal surveying, searching, air photography and video. It's really a great budget platform to do almost anything. It is based on the open source system so although you can fly it right out of the box, some tinkering can and should be done to get the most out of it.
It's a true 350mm + size unit and can be kitted with telemetry, GoPro type cameras, GoPro type cameras on Gimbals, FPV Camera & transmitters. You can even have a gimbal mounted GoPro camera AND a fixed FPV camera. It will readily carry that. There are just so many addons that this one can take that it boggles the mind.
Price as tested: $ 289.99 (watch prices, it's cost changes frequently)
There are several versions out there. I opted for the Open source MX + GPS version listed as the Auto Pathfinder. Is's pretty complete.
There are versions that come without the radio set for less money but they involve a lot more tinkering and if this is your first bigger quad, or your very first one quad at all, then you should avoid that version.


We just got this one and a few of the addon components should be here next week so this will be an ongoing review as we add things and tweak them so stay tuned.
This is what we can report so far:
The following is what we called a "Acceptance inspection". In the Air Force, whenever an aircraft was delivered to another unit. it is inspected thoroughly.
If you are not comfortable performing this level of disassembly on your quad, or if you don't have the skills to do so safely, i urge you to find someone that can help or do this inspection for you.
For optimum use of time. Attach your battery to the provided (or an upgraded aftermarket charger).
Once the battery is attached, then plug the charger in.
Important: Follow safe handling procedures for LiPo batteries.
Initial Acceptance Inspection:

If you pop the cover off of the GPS mast (the GPS is actually inside the main body) You will find the Magnetometer. It's the drones onboard compass. By putting it up here, it is not influenced by the rest of the onboard electronics. If you are going to open the body (and I insist on doing so for a detailed inspection when any new drones arrive) you must unplug the magnetometer. Make sure the actual sensor is VERY secure, it is one of the parts that if it comes loose in flight, you could end up in trouble. This was secured with double sided foam tape AND hot glue. This is GOOD.
Opening the body:

 There is an included tool, a multitip screwdriver. One double ended part is the Allen key. The smaller tip is for the small screw at the very end of each arm. the tool is rather soft metal and easily damaged. I opted to leave the tip screws out.
The middle of the round part are the motor mount screws. They are the larger of the Allen key sizes. You do not need to remove them. Just make sure they are not loose. Avoid excess force. 'Finger tight' is the ideal level of torque. The next 2 screws just before the round part of the arm and the one near the main body are the next to come out. Make sure that the clear lenses covering the LEDs is fully snapped in place.
The inside components:

 Flip the CX20 back onto it's belly and gently remove the upper half, being especially careful of the wires for the magnetometer. You can now see the interior.
 In each arm is the ESC (Electronic Speed Control) for each motor. They are the long skinny circuit board. It also holds the arm LEDs.
The silvery square in the main body is the GPS sensor. This location is actually quite good. I got satellite lock in seconds where you can actually end up waiting up to 2 minutes.
The white box under the GPS module is the radio control receiver. Both GPS and RX are held in place with double sided foam tape and a small zip tie (This is GOOD.
The rectangular box is the APM (Auto Pilot Module) and runs the whole craft. make sure it is very secure as well. Mine is held with double sided foam tape and a small zip tie (This is GOOD).
The foam tape absorbs some of the vibrations as well as secures the components. On the far side of the APM is a mini USB cable. It runs to a small board at the belly. It has the connections for the camera and gimbal and whatever other accessories you decide to add.
 Here is a closeup of the interior.
Make sure all plugs are secure, Inspect all solder joints to make sure they are in good shape. Sometimes a poor joint can occur and the few minutes inspection here could prevent a lot of damage and frustration.
You should also make note of the numbers on the ESCs (the green circuit boards in the arms, close to the motors). Write this down somewhere and make sure the model and version numbers all match. If they are at all different, that may make it difficult to get them calibrated. This may not be necessary so I suggest you only perform this calibration if you really think you need to or if there are problems;
http://copter.ardupilot.com/wiki/initial-setup/esc-motor/
Tip:
You can also see the transmitter. I have added a 'cheat sheet' guide to the switches. I did not use the wording in the manual but terms that I personally consider easier to remember.
Radial means that no matter what direction the quad is pointed, operated based on radial directions from the transmitter. If I push the stick forward, it flies away from me, no matter where the front is aimed. This can be a good setting for less experienced pilots and it really is pretty easy. You don't have to worry about orientation on a craft that looks the same at every angle.
Military members will know that RTB means 'Return To Base'.
 Now that I am satisfied that everything is secure, the body is reassembled. Making sure that the wires for the Magnetometer are fed into the mast (carefully). All screws redone, but again ONLY finger tight. If you overtighten, then things will break or pull out of where they go. Make sure you reconnect the magnetometer (MAG for short) and snap the cover back on.
Note there are 2 antennae. This has a diversity receiver. If there is a better signal from one over the other, it will select that signal for control. This is a much safer system than just one. It can also give you better control if you are at the limits of range (try to avoid being in that situation though).
 This is a little better view of the plugs on the belly of the CX20

 The landing struts are attached with simple thumbscrews, Make sure to route the antennae into the grooves and notches provided. do NOT overtighten the thumbscrews.
 The propellers go on to specific motors. there is a little arrow on each arm. The clockwise arrows are on the arms with the black acorn nut on the motor The correct propeller for this is the 'A' on them. For ease of identification, I marked the bub of the propellers with black permanent marker. The Motor shafts are keyed (they have a flat section) so the props can only go on one way. Make sure to tighten with the wrench, but again, only finger tight. You will notice that the black nuts are left hand threaded so you can't really mix them up. When all is said and done, you should have the black at opposite arms.

The transmitter (Tx) is a 6 channel model. 4 channels are the sticks and the two knobs between the sticks and the antenna are for whatever you add. Most typically they are used for the camera gimbal. If installed (look for an upcoming entry), you can tilt the camera side to side plus up and down by adjusting the knobs.
There are also 2 switches one at each upper corner of the transmitter. The combination of their settings can perform several functions. for example: if you set the left switch up and the right one all the way down, the CX20 will automatically return to where you took off. This can literally save the unit in many circumstances. I made up a simple reminder chart that I have taped onto my transmitter.
I suggest you look at the Mission Planner software at this point. This is just a few of the many excellent tutorials on YouTube that explain how to set it up.
Note: if your APM is made by Fatshark, the software and procedure is a little different.
http://diydrones.com/profiles/blogs/successful-test-of-the-cheerson-cx-20-apm-arducoper-firmware
https://www.youtube.com/watch?v=JMSwDUrns2Q
More to come. Please check back later.
This is a GPS equipped full featured unit that can do almost anything including autopilot flight. You can use the Mission Planner software and use it for automated areal surveying, searching, air photography and video. It's really a great budget platform to do almost anything. It is based on the open source system so although you can fly it right out of the box, some tinkering can and should be done to get the most out of it.
It's a true 350mm + size unit and can be kitted with telemetry, GoPro type cameras, GoPro type cameras on Gimbals, FPV Camera & transmitters. You can even have a gimbal mounted GoPro camera AND a fixed FPV camera. It will readily carry that. There are just so many addons that this one can take that it boggles the mind.
Price as tested: $ 289.99 (watch prices, it's cost changes frequently)
There are several versions out there. I opted for the Open source MX + GPS version listed as the Auto Pathfinder. Is's pretty complete.
There are versions that come without the radio set for less money but they involve a lot more tinkering and if this is your first bigger quad, or your very first one quad at all, then you should avoid that version.
We just got this one and a few of the addon components should be here next week so this will be an ongoing review as we add things and tweak them so stay tuned.
This is what we can report so far:
The following is what we called a "Acceptance inspection". In the Air Force, whenever an aircraft was delivered to another unit. it is inspected thoroughly.
If you are not comfortable performing this level of disassembly on your quad, or if you don't have the skills to do so safely, i urge you to find someone that can help or do this inspection for you.
For optimum use of time. Attach your battery to the provided (or an upgraded aftermarket charger).
Once the battery is attached, then plug the charger in.
Important: Follow safe handling procedures for LiPo batteries.
Initial Acceptance Inspection:
If you pop the cover off of the GPS mast (the GPS is actually inside the main body) You will find the Magnetometer. It's the drones onboard compass. By putting it up here, it is not influenced by the rest of the onboard electronics. If you are going to open the body (and I insist on doing so for a detailed inspection when any new drones arrive) you must unplug the magnetometer. Make sure the actual sensor is VERY secure, it is one of the parts that if it comes loose in flight, you could end up in trouble. This was secured with double sided foam tape AND hot glue. This is GOOD.
Opening the body:
The middle of the round part are the motor mount screws. They are the larger of the Allen key sizes. You do not need to remove them. Just make sure they are not loose. Avoid excess force. 'Finger tight' is the ideal level of torque. The next 2 screws just before the round part of the arm and the one near the main body are the next to come out. Make sure that the clear lenses covering the LEDs is fully snapped in place.
The inside components:
The silvery square in the main body is the GPS sensor. This location is actually quite good. I got satellite lock in seconds where you can actually end up waiting up to 2 minutes.
The white box under the GPS module is the radio control receiver. Both GPS and RX are held in place with double sided foam tape and a small zip tie (This is GOOD.
The rectangular box is the APM (Auto Pilot Module) and runs the whole craft. make sure it is very secure as well. Mine is held with double sided foam tape and a small zip tie (This is GOOD).
The foam tape absorbs some of the vibrations as well as secures the components. On the far side of the APM is a mini USB cable. It runs to a small board at the belly. It has the connections for the camera and gimbal and whatever other accessories you decide to add.
Make sure all plugs are secure, Inspect all solder joints to make sure they are in good shape. Sometimes a poor joint can occur and the few minutes inspection here could prevent a lot of damage and frustration.
You should also make note of the numbers on the ESCs (the green circuit boards in the arms, close to the motors). Write this down somewhere and make sure the model and version numbers all match. If they are at all different, that may make it difficult to get them calibrated. This may not be necessary so I suggest you only perform this calibration if you really think you need to or if there are problems;
http://copter.ardupilot.com/wiki/initial-setup/esc-motor/
Tip:
You can also see the transmitter. I have added a 'cheat sheet' guide to the switches. I did not use the wording in the manual but terms that I personally consider easier to remember.
Radial means that no matter what direction the quad is pointed, operated based on radial directions from the transmitter. If I push the stick forward, it flies away from me, no matter where the front is aimed. This can be a good setting for less experienced pilots and it really is pretty easy. You don't have to worry about orientation on a craft that looks the same at every angle.
Military members will know that RTB means 'Return To Base'.
Note there are 2 antennae. This has a diversity receiver. If there is a better signal from one over the other, it will select that signal for control. This is a much safer system than just one. It can also give you better control if you are at the limits of range (try to avoid being in that situation though).
The transmitter (Tx) is a 6 channel model. 4 channels are the sticks and the two knobs between the sticks and the antenna are for whatever you add. Most typically they are used for the camera gimbal. If installed (look for an upcoming entry), you can tilt the camera side to side plus up and down by adjusting the knobs.
There are also 2 switches one at each upper corner of the transmitter. The combination of their settings can perform several functions. for example: if you set the left switch up and the right one all the way down, the CX20 will automatically return to where you took off. This can literally save the unit in many circumstances. I made up a simple reminder chart that I have taped onto my transmitter.
I suggest you look at the Mission Planner software at this point. This is just a few of the many excellent tutorials on YouTube that explain how to set it up.
Note: if your APM is made by Fatshark, the software and procedure is a little different.
http://diydrones.com/profiles/blogs/successful-test-of-the-cheerson-cx-20-apm-arducoper-firmware
https://www.youtube.com/watch?v=JMSwDUrns2Q
More to come. Please check back later.
Review Syma X5C-1
a product review of the Syma X5C-1.
 Price as tested: $60.00 Cdn.
Prices vary so keep an eye out, you can sometimes get them for under $50.
As mentioned before. We really like this one.
Pros:
It has very stable manners in the air.
It can still perform stunts.
It can be very fast.
Sturdy construction.
Comes with propeller guards.
Photo/Video camera included. Reasonable resolution.
Easier to see than some in this overall size range.
The Camera and landing struts can be removed for better performance
It has a Power switch.
Cons:
Tends to be easily affected by the wind.
Not as great a radio range as I would like.
Overall:
This would make for an excellent first Quadcopter. It handles well, is predictable and is an excellent platform to hone your skills for when you might go into the next larger class (250-350mm+)
 It just needs 4 AA batteries (for the transmitter), and it's ready to fly.Even spare props are provided.
 On the right is the stock 500Mah 3.7 volt LiPo battery. It will last about 6 minutes if you are not using the camera. You will probably want to order a few extra batteries. If so, also get the group charger. It can charge up to 5 at once. A full charge takes several hours. The additional batteries are typically 650Mah and last about 8 minutes if you are not using the camera.

 The stock battery fits with ease. The slightly larger additional batteries are a snug fit.
 It resembles a baby Phantom.

 As you can see, the motor is geared for better performance. If you slam the throttle, this one really skyrockets up there. Be careful of the range though or be prepared to wave goodbye.
I urge you to put your phone number on yours with permanent marker.

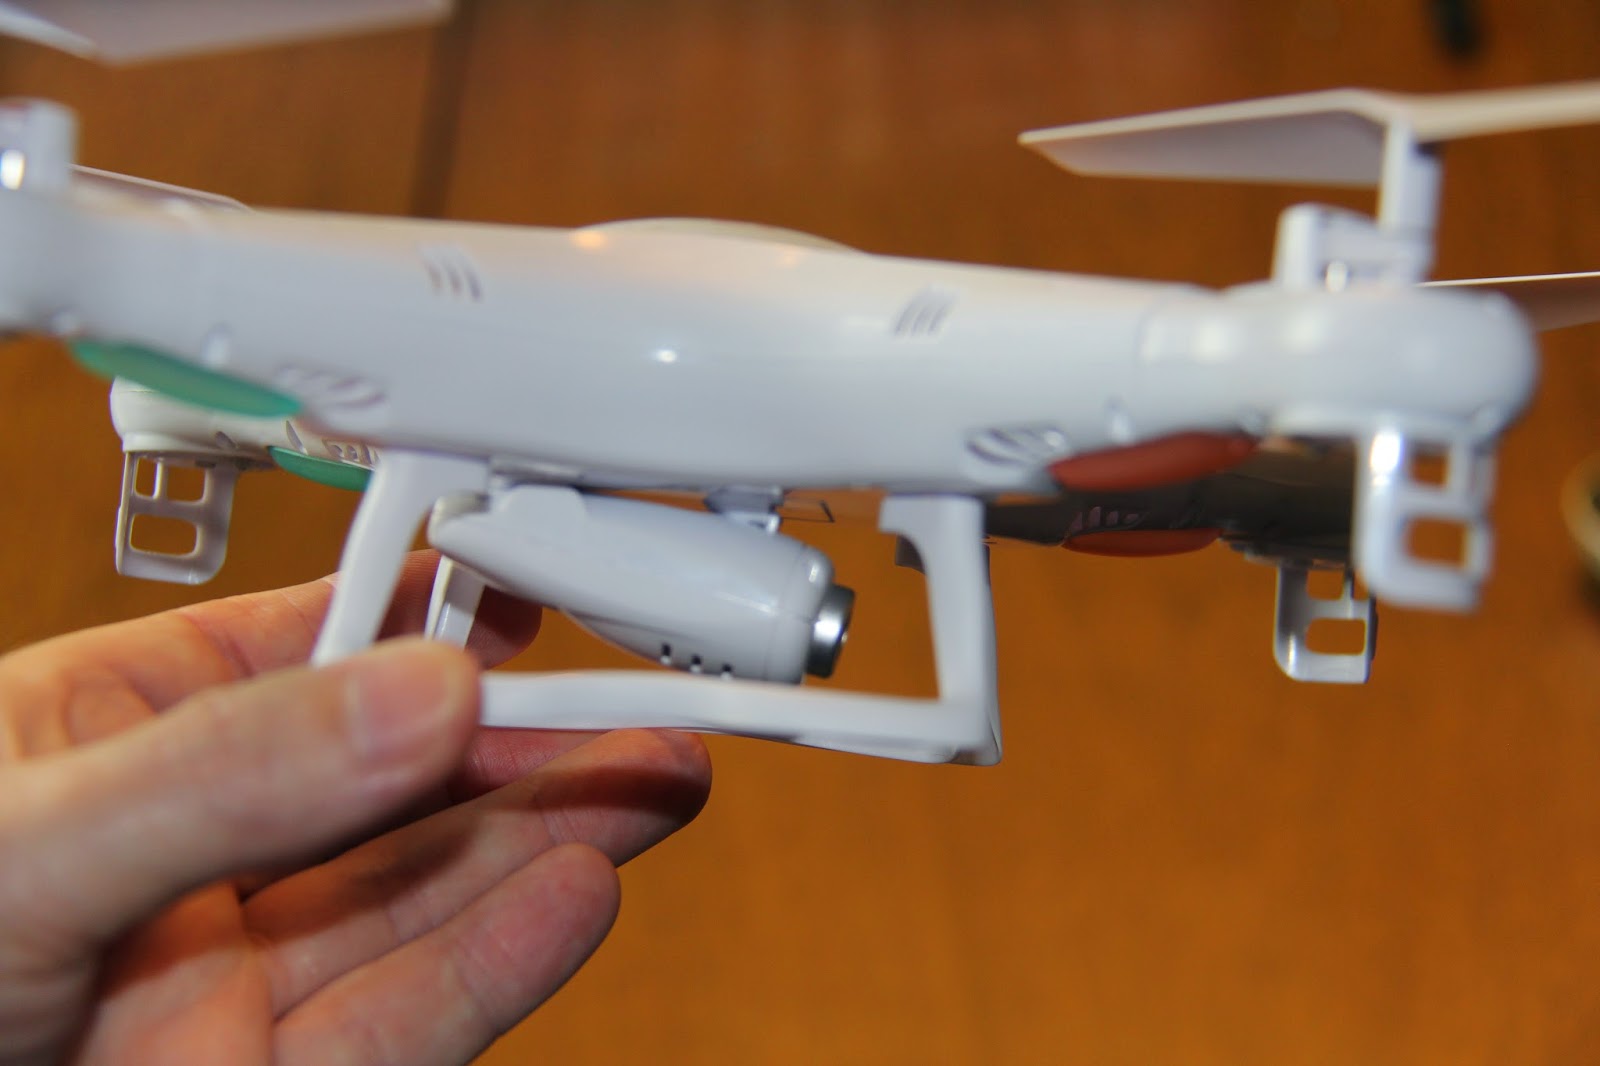
Some people don't like that the camera is tilted down. If you want sweeping horizon shots it can be a problem but you can reposition the camera to a shallower angle.

 The transmitter functions well andIi never have more than 2 seconds for the Tx and Rx to bind. There is an LCD at the bottom that tells you the transmitter battery level, and the trim settings. The bottons on each side of the screen are dummies, just there for looks.
On the shoulders of the TX are 2 buttons. The left one is for toggling dual rates (how responsive it is) and the right is for making it do a flip. It also commands the camera (as does the throttle trim button).
It works well but it does feel light and cheap.
Prices vary so keep an eye out, you can sometimes get them for under $50.
As mentioned before. We really like this one.
Pros:
It has very stable manners in the air.
It can still perform stunts.
It can be very fast.
Sturdy construction.
Comes with propeller guards.
Photo/Video camera included. Reasonable resolution.
Easier to see than some in this overall size range.
The Camera and landing struts can be removed for better performance
It has a Power switch.
Cons:
Tends to be easily affected by the wind.
Not as great a radio range as I would like.
Overall:
This would make for an excellent first Quadcopter. It handles well, is predictable and is an excellent platform to hone your skills for when you might go into the next larger class (250-350mm+)
I urge you to put your phone number on yours with permanent marker.
Some people don't like that the camera is tilted down. If you want sweeping horizon shots it can be a problem but you can reposition the camera to a shallower angle.
On the shoulders of the TX are 2 buttons. The left one is for toggling dual rates (how responsive it is) and the right is for making it do a flip. It also commands the camera (as does the throttle trim button).
It works well but it does feel light and cheap.
Subscribe to:
Posts (Atom)