Tuesday, July 28, 2015

Upgrading the landing legs

The frame I bought came with the tall legs that give good clearance for a camera. I nickname these 'Spider legs" since they kinda look like a spiders legs.


The problem with them is that at a critical point in the legs, there is a slot cut in for what I assume is for routing wires. This makes them extremely weak where they need to be stronger.

The first 2 flights, one broke. A splint was rigged but it and another leg broke, and there were no crashes or even moderately hard landings.


I opted for a far better configuration. It involved removing the tubes and replacing them with the larger ones that come with the kit. The up side is that it provides a lot more clearance, is many orders of magnitude stronger and more resilient.


 It also allowed for the 2 cameras to be mounted far enough ahead that they are between the front motors.

 The battery was moved further back to ensure good balance. A keen eye might notice the foam between the battery and the plate. It is to prevent the bolts from digging into the battery and damaging it.

Handy Video Box

Regular reader know that I like to have a fixed FPV camera on my Quadcopter as well as the pivotable HD camera. I was wasting a lot of time sorting through the birdsnest of cables.


The solution was to build a video box. A lucky find at a garage sale netted the aluminum box for $4


I bought a second 7" screen. and cut a panel of 1'8" ply to fit the two panels
This is backed by strips and blocks of 1" x 1" wood.
A little black acrylic paint dresses it up


A sun visor is made of black foamboard. This is edged with black duct tape to prevent delamination and it is a hing in some areas. The shade is held by 3 small Velcro spots. Never count on the self adhesive, always use a little contact cement and let it set before attaching the parts. Patience is your friend.


Another strip of 1" x 1" gives more clearance for the cables and battery. Another foamboard panel forms the lower door. a single Velcro dot keeps it closed. Note the notched out sections on the panel, This is for the Receiver wires.


The receivers are attached to a small strip that hooks onto the lid and is secured with Velcro again.

I built a power box for before I came up with this. It is just an electronics project box with a series of sockets connected together. Multiple formats to connect to whatever battery pack are on the other end.

There is enough room for my laptop to be the ground station for flight planning as well as it's own telemetry. The fixed FPV camera also has an OSD (On Screen Display) telemetry too.


Now setup and takedown takes mere seconds and the equipment is not getting damaged.  

Sunday, April 12, 2015

The waiting game

At this point, we are waiting for more items for review to show up so this may be a good time to discuss some general items.
Several people on the message forums have been asking about what they should get or build as their second quad. That really is two subjects.

First, you have to determine what you plan to do with the craft.
Some just want a larger general purpose flier for fun.
Some want a fast 250mm racer.
Some want a large stable film or photography platform.
and some want something that is a 'jack of all trades', a mid sized quad that can do all of the above, even if it is a compromise. None can be truly excellent at all, but they can do a fair job.

Endurance is also something you have to have realistic expectations of. I read just this morning that someone wants a funfly quad what has a 45 minute or more flight time. Most of us have more realistic understanding that a 10-15 minute flight is fine for most of the time. It's a nice break in the intense concentration to swap batteries out.


Once you know what you want to have the craft do, you have to select the components. Typically you need to establish a few things, Purpose, Size, and Budget.

Purpose will determine size. Budget will limit it.


Secondly how knowledgeable and skilled are you at building?
There are several skill sets involved.
*** How good at following directions are you? Some units require assembly in a specific order or using specific materials or methods. Many times the directions are poorly translated or are strictly pictograms. Sometimes there are no directions at all. You are forced to do a bunch of research to find ANY guide at all. Sometimes you have to find directions to a similar part or assembly and figure out what to do when there are differences. 
*** How are your soldering skills. There is some parts that ideally require a soldering gun.
most parts are finer soldering where a fine soldering iron are ideal. I use both a heavy duty soldering gun and a temperature controlled soldering iron. This may seem like an extravagance but a failure in any soldering connection in flight can mean disaster.
*** How are your mechanical skills? matching the correct screws, where and when (and how) to use LocTite. Avoiding cross threading. Where to deviate from the stock design for changes you desire/optional equipment.
*** How good are you at electrical troubleshooting? With all the connections that are of critical importance, a missing or wrong connection can lead to all sorts of confusing reactions from the quad.
*** How capable are you of working with the software? There are some wonderful flight controllers that you can easily sort out the software to make the whole thing work, there are others where you can adjust parameters to make the craft work better (or not at all). You can enable special abilities.

Then there is the mods.....seldom are we ever satisfied with how the factory put the craft out. Sometimes you need a different landing gear setup, the ability to carry larger or more batteries. the addition of telemtry, an FPV camera system a ground station setup. a high end filming camera setup. Special equipment such as dropping a hook to recover another quad stuck in a tree or on top of a building. there are all sorts of mods and extra abilities that they are capable of. Just remember that the more you add to it, the shorter the flight time and the worse it will fly.
Regular readers of this Blog may recall that we added the one gimbal to a CX20 that added so much weight that the flight time was less than half, the handling was terrible. The next gimbal was 60% of the weight of the first one and the CX20 was almost like it had no gimbal. There is a threshold where the performance and handling drop off rapidly.

Different props can change things for the better to some extent, and that is something else. If you fly with a camera, you know about the 'jello' effect that sometimes happens. There are several tricks there. One is to change the density of the shock mount. It can change how the camera handles the vibrates. another is the location and in particular, the props. Every motor can run a range of props. there will be several diameters and pitches that will work and changing to the right ones can radically change how things work. Our friends at Rotorporn brought us that tip.

Fingers corssed, we will have something more visible to show and tell next entry.
 

Tuesday, March 31, 2015

Attaching accessories for your Multirotor

We like to add items to our quadcopter, drones, multirotors, whatever you want to call them.


The external plug location.

First off. Since most of us add a camera and gimbal to quads over 250mm, One of the problems we all run into on the CX20 is the location of the electrical connection on the belly. a slight modification opens up your options a lot.

When you have it together, carefully analyze where would work for you. Take pictures and pencil in some ideas. Then open it up and lets get to work.


Again, don't do ANY cuts until you have it open so you don't cut any wires.

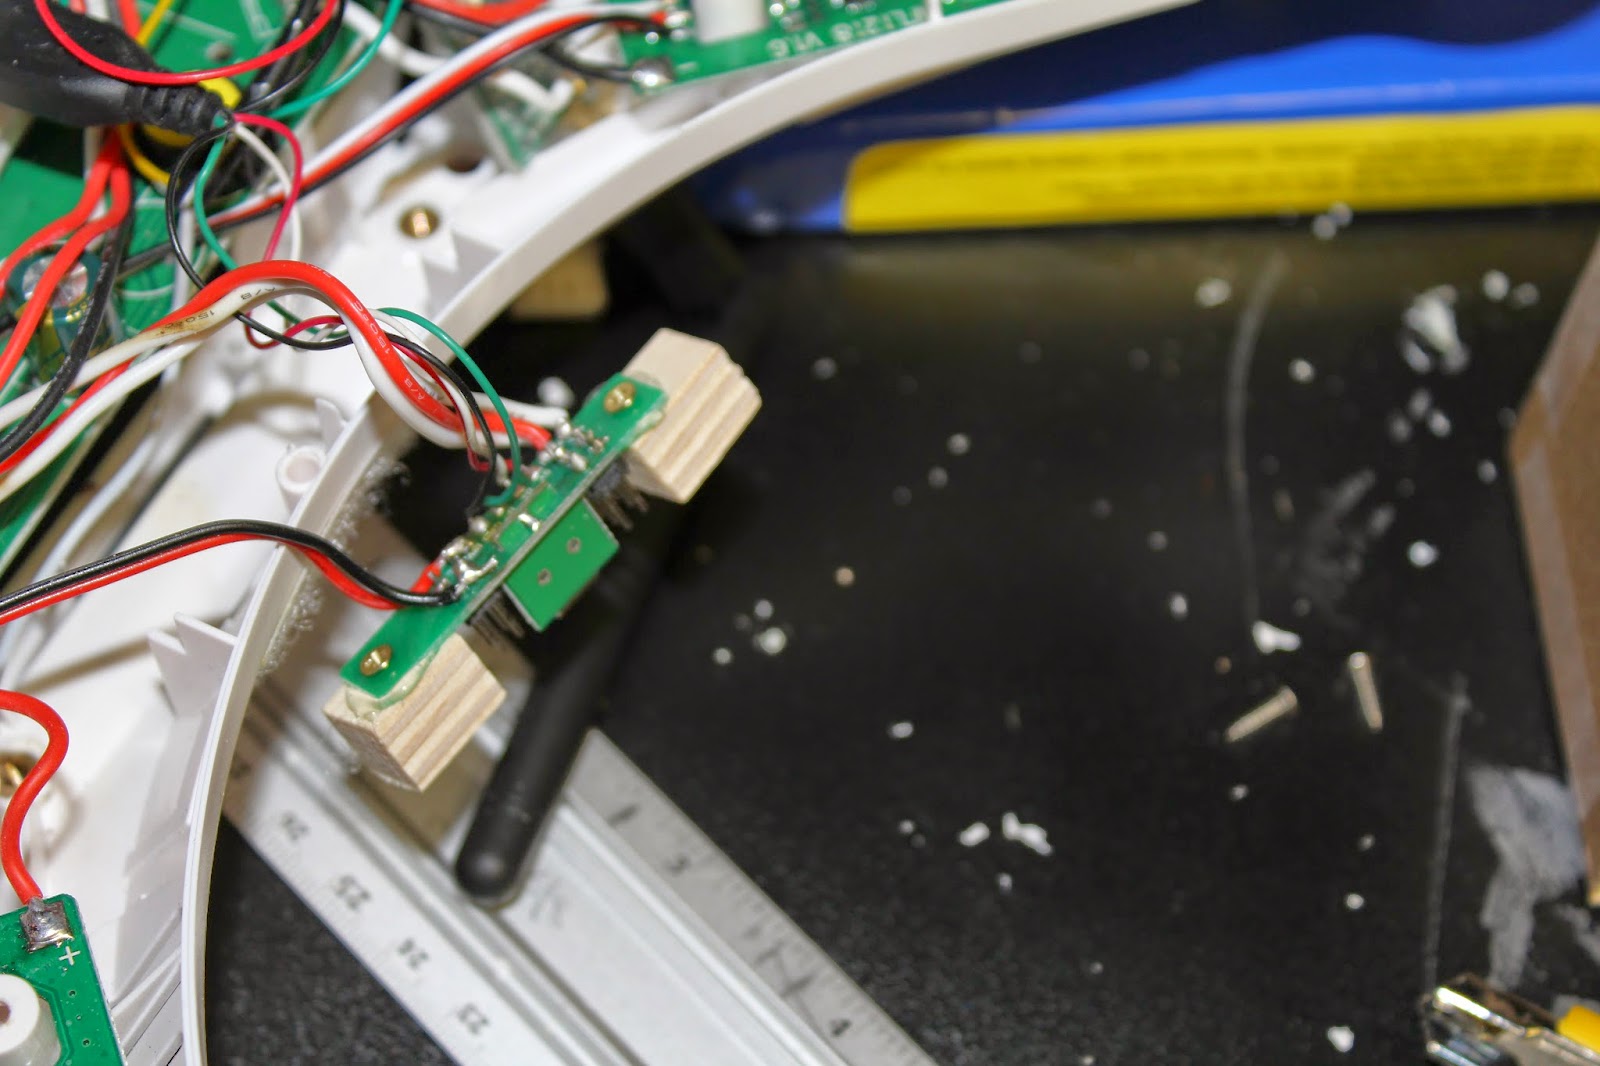
The plugs would have been sticking out if I attached the mini circuit board directly to the inside of the shell. so some 1/4" standoff blocks glued to the board and backed up with a single screw each. predrill to make it easier and prevent splitting.


The screws from inside that held the circuit board in place can be used on outside to hold it again (predrilled holes again. Make sure the board is centres so you can make all connections to the pins)

 Now that the connections are relocated. The old hole in the belly, I glued a small bit of styrene plastic over the open hole in the belly to put some strength back (not shown in this picture)


Accessory sideboards

I was never happy with the FPV transmitter velcro attachment on the side
There are all sorts of options you can order. Some even made of carbon fibre. These can be great, but can be expensive and you have to use extra precautions working with it.

I decided to proceed with this project. It also lets me show you a few interesting tidbits that might be unknown to some of you that I learned in my days of Fixed wing R/C aircraft.


First off, I looked at the structure of the CX20. It is a plastic shell design, Think of it like an exoskeleton. They entire structure comes from the the shape and curves of the body. If you take a sheet of thin cardboard, it's very flexible. No rigidity. Now if you bend it twice and tape it together, it is a triangular tube. now it is surprisingly strong. Some parts are in compression (squeezing) and some in tension (pulling apart, like pulling on rope). The other stress is shear (This is sort of like tearing). This is one of the basic principals of engineering. Using the right materials to be in tension and which in compression mean that you can combine several materials and the result can be stronger than either. Bear in mind that a substance can be hard but not strong, a substance can flex but be very strong.


The lightweight hobby grade plywood is great in compression and to some extent tension, and fair in shear strength but if you take a good general purpose aliphatic resin (wood glue or Weldbond) and use it to bind a single layer of fibreglass cloth to that plywood, the strength is amazing, It is strong in tension and compression and in shear.


What I did here was to take some Weldbond glue and water it down 2 parts glue, 1 part water. This lets it penetrate better into the cloth and the wood. It's probably not necessary but i do like the results.
I put a sheet of cellophane down, then the wood (1/8" birch plywood), apply a layer of the glue to the wood and lay the cloth on it. Make sure the cloth extends past the wood a few CM (less chance of the cloth falling apart). Work the cloth with some scrap cardboard until the glue is covering and coming through the entire area. Flip it over and repeat to create a double sided laminate. Cover this side with cellophane as well (To smooth and contain any oozing). I put this on a few sheets of newsprint (both sides, again to contain any oozing). place this on a clean smooth surface and place another clean smooth surface on top. Add weight then let this dry for 2 days. After the 2 days, it will not be fully cured yet. take it out, carefully remove the cellophane and let it continue to dry for another full day. Cut away the excess cloth that is not supported by wood and you have an amazingly strong homemade cheap composite panel. I cut of a strip about 2 CM wide of this composite and a similar sized bit of the 1/8" birch plywood without the glass cloth, then challenged a friend to break them, the bare plywood broke with only slight effort, The glass reinforced one he too 2 tries and notable effort to break it, but it still was in one part, just lost most of it's structure.
This finished composite cuts with little more effort than it did before so it is very workable, it's very light and very strong.
I'll grant that its not as strong as as carbon fibre panels, but it is still quite sufficient for many of our needs in this hobby.
  
 The stock thumbscrews from the landing gear easily allow you to use them through these accessory plates.


 I cut a large section out to allow access to the plugins
 The FPV transmitter sits more securely with velcro holding it in place. A rubber band is cheap backup.


Extending the CX20 Battery Bay

I have purchased a 3200Mah Lipo for my CX20, and the battery bay is too short to fit it. After a bit of basic design work and examining the structure, I had a plan....

I opened the shell of the CX20 and made sure there were no wires in any peril. Measuring the battery and all the plastic several times over,


I took a Dremel and cut into the belly just where the front curves up. I cut the sides just where there are 2 vertical plastic stiffeners. I left the narrow strip at the top (about 4 MM) intact since it provides structure in tension. It wasn't much but it would have sagged otherwise (I am over 50, trust me, I know about sagging, lol).


Now to refine the sizing.


And work out the shape of the extension.


Since I was doing some body work anyway, I decided to install the FPV camera in this housing. And while I was doing this. Install a headlight. More on this at the end of the article.

A test part made of cardboard and tape lets me refine the shape and the fit before I cut the actual materials.

Speaking of which. I picked up some 40 thou (.040") Styrene plastic sheet at the plastics dealer. It's a little soft on it's own. I Glued some balsa to the back of the plastic. I used Gorilla Glue. I put a little plastic glue on the styrene and the gorilla glue on the balsa. Use some cellophane to contain the mess, and place this between two boards with some weight overnight.


...unfortunately they slid a bit.
Note to self, a strip of tape would reduce the chances of this.

 trimmed off the excess balsa, then did one final fitting with some more cardboard.


With that final set of shapes, I cut the bottom and side panels of the box.


The front plate is easy to work out at this point. I carefully ground out the hole to fit the LED diffuser and the camera. The flipped open top was for figuring out how it was going to be finished.


I was going to build the cover from strips built up. but the thing was not working out.


Using a few bits of thicker balsa, I was able to build a different cap and shape it to mate with the upper shell. I glued in a strip of 1/8" ply for a screw point and a block in the bottom half for the screw to attach to.

A little foam as a means of keeping the battery from moving around worked well.
The 3200Mah battery fits in with ease. It fits like a dream. The 5500mah battery is just a little too thick to fit in the extension. I could have made it a little bigger but this was done before the 5500's showed up.

The point of this extension is to house the larger batteries with the door closed, and to house the FPV camera and the LED headlight.


Now the headlight..... I ordered some high intensity LED headlights from Banggood.

http://www.banggood.com/Stunning-Highlight-LED-Night-Light-for-Multicopter-p-917959.html

They are cheap and intense, remember that they need 3V, not 5V.

Some are to be fixed and work with the FPV camera as well as help with orientation and navigation.

My further plan is to put 2 on the Gimbaled camera too (so that they can tilt and pitch with the camera.


......Now most of you have access to a Costco. Look for a 3 pack of headlights like this.


These are a perfect source of a similar LED that runs off of 5V.

I find it funny that you have to open the back to see the instructions telling you that you can open the back.
3 screws in the battery compartment will let you open it up.


The little circuit board contains a switch and a tiny chip. You can't really use it, BUT if you can, you can desolder the surface mounted resistor and wiring it inline with the LED. alternately get yourself a ballast resistor and wire it in series. I have a 5V BEC rigged inside and hotglued in the LED and it's diffuser. It puts out light like a huge amount of light in a tight beam. For FPV when you are looking in shadows, it's quite handy.