One of the biggest hurdles we face in this hobby is that of reasonable people that are concerned that some paparazzi is going to be hovering outside their 10th floor apartment window. Sure it is technically possible. but a telescope from the apartment across the street would be cheaper and easier. But that does little to ease that concern over privacy.
And lets not forget that flying a larger drone, especially with the stiff carbon fibre props can cause injury. So fly safe and we won't be forcing the feds to clamp down with very restrictive regulations.
OK, now lets talk about FPV...First Person View.
This is a way of having a 'pilot seat view' of what you are doing with your drone. This is probably one of the most useful applications of our hobby. Taking pictures and video from places and angles that only a helicopter could get to. Sometimes where even they cannot go. A decent FPV setup lets you see what you are taking pictures of. You can see if the sun is reflecting too strongly from that angle. You can tell if what you are taking pictures of is properly in view. In the fall of 2014 severe rains in Washington state threatened some homes in a cliff side area. Drones were able to let the people see the conditions and in doing so, posed no risk to a person that otherwise would have had to rappel down to survey the conditions. (yet another important thing this hobby can do).
Now with an FPV system, you can adjust and get the pictures you want. with a fixed camera system, you have to 'best guess' the camera angles and conditions. As you might guess, the fixed camera system is a lot less expensive and much simpler than an FPV system. That being said you have to also bear in mind that the more weight and power demands on the battery, the shorter the flight time and typically the worse you quad will feel to fly.
Now before the hatemail starts flowing, please bear in mind that this is an overview, I am talking about the general way things work. Sure someone probably has the mythical 'Wundercopter' that can fly forever with a full FPV setup and flies fantastic when loaded down, but by far, most are going to be affected in a negative way to some extent. probably not a lot but there is a difference.
Ok, back to the subject at hand. We have so far reviewed the:
Walkera QR W100S with fixed FPV camera.
Syma X5C-1 with fixed camera.
Both can take video and still pictures. The differences are vast however. The Walkera tested is an entry level system (they make some class leading professional systems too). The video is sent to your smartphone or tablet. The picture quality is poor and the frame rate is very low. I personally don't see how you can fly it in FPV mode. You can take pictures and video for later review but you really HAVE to fly it visually and with a standard transmitter. Be aware of short range.
The Syma H5C-1 has a camera for still pictures and video. They claim it is an HD camera. I dispute that, but it's still decent quality. The pictures and video are saved to a mini SD memory card and you have to put it in your computer or tablet to see the pictures & video. The camera is fixed in position but on the ground, there are ways to reposition it. You can also remove the camera completely to save a little weight.
An FPV system lets you fly like you are actually in the drone. The frame rate is good enough that you can easily keep track of what is going on. Complete flights can be made without even seeing the drone itself. but it is STRONGLY suggested that you have a spotter keeping real time eyes on the drone. If you lose signal, you will have to figure out where it is and you might not have the time before it's on (or IN) the ground.
Systems for viewing the video signal are either goggles or a screen. The screen lets several people see what is going on, the goggles are a one person setup, but you are not trying to see past any glare or reflections. The goggles mean that if you lose signal and need to take them off to see the drone, you have to take a hand off the transmitter at a time when that is not the best thing to do. You have to decide on where the tradeoff makes more sense.
So next off, lets decide on the image type and quality. Are you just enjoying the flying? are you after decent quality images or are you after professional level stuff? The basic fixed camera setup is going to be fine for most people. A sports camera (GoPro or similar) Offers a much better quality picture. They have a variety from an easily affordable one with respectable resolution, and up. Some models go up to 4K (Ultra High Definition)...at an according price. And there are similar looking versions from other manufacturers that are often cheaper.
Do you want the camera to be able to move seperate from the drone? You will need a gimbal system. It lets you adjust the camera angle and they also compensate for the movement of the dron. Way you are fighting a wind. The drone has to lean into the gusts. The resulting video could make it hard to enjoy. Some people might get motion sick. A Gimbal system compensates with it's motors and solid state gyros to give you a pretty steady picture. Again, the fancier systems, the higher the price.
Now for FPV, you have to send this picture to you (the pilot). For that, you will need a transmitter. and to get the pictures on the ground, you will need a receiver. Do yourself a favor and upgrade the antennae. The stock ones are usually the black "rubber duckie" ones. They work ok, but there are conditions that they can drop signal, and their range although not bad, could be better. The omnidirectional 'mushroom' type (if covered) or the 'Eggbeater' (uncovered) will offer a better signal and is a LOT better if the drone flies at funny angles. They are pretty cheap so it's worthwhile. Pay attention to the mounting size, type and gender when ordering. You will need power on the receiver too. Now the screen, Are you going to get a dedicated screen? 3.5"-10" are available for a reasonable price. Some have the receiver built in.to save some hairpulling. I chose to use a laptop. I just added a USB Video input adapter. For your first FPV setup, get a complete set. ordering the components can make for a lot of frustration and triple checking compatability. A little poking around Youtube will show you what I mean.
Then there is Telemetry. It's a handy thing to know your altitude, battery status, heading, etc. A telemetry set will give you a virtual cockpit worth of helpful information.
Now that it's all together:
OK, Great. Now you can see what you are taking pictures and video of. You can adjust the angles in flight. You can take pictures of the cliffside. You now have a very elaborate means of taking epic selfies.
With this equipment, you can now download the flight controller software (free) and you can plot your flight. You set waypoints and select altitudes for those waypoints. It will follow your commands. You can even use the software to fly a pattern over a specific area to perform a survey of that area. You tell it the field of view of the camera and the altitude and the software will determine the best pattern to fly, how many passes and it will determine it to allow just a bit of overlap. All automatically. Just remember, if it loses signal in flight, you can set it to automatically fly back to the launch point and autoland. This is a vast are of possibilities and can make our hobby into a potential business. At the very least, a very useful tool for some tasks.
I will provide links to the components I am using and when I have a chance, I will also post videos of the assembly and test flights. in a few weeks. There is other stuff I think you might get some use from first.
Disclaimer: The following is a general component list. By no means is it an endorsement of the specific products or the suppliers. Always check for compatability. I take no responsibility for the system or the way it works for you. There are other units available that may work better for you
Check for legality in your Country Province and Municipality etc.

Transmitter & receiver
Note: The receiver apparently gets warm so a heatsink (aluminum mounting plate) would not be a bad idea.
It is suggested that you ensure a 5.8Ghz 200mw or better strength. The set above is 600mw.

Antenna option 1 Note, Ensure you have the correct connection, Be aware that there is a specific unit for the transmitter and a different one for the receiver
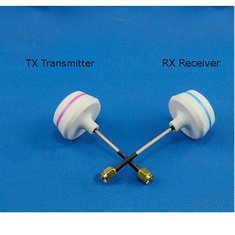
Antenna option 2 Note: ensure you order the correct connector type. This set comes as a set, 1 for the transmitter, 1 for the receiver.

Viewscreen

Viewscreen with receiver (check compatability with transmitter)

Goggles
This is a Fatshark set that looks complete. I would personally change the antennae.

Laptop USB adapter (if not using a dedicated screen)

Mini Camera
Note: Make sure you order NTSC for North America, NOT PAL
It is advised by many to get a Wide Angle Lense. Typically about $ 5.00

Camera
This is a great option for those that want something like the GoPro but at less cost.
This model can record or transmit but not both at the same time.
Camera Mounts. The basic fixed position camera can be mounted in all sorts of ways. I won't waste your time explaining. Just be safe and maybe have a secondary means of securing it.

Gimbal mount
To allow positioning of the camera in a different direction than the drone is flying. Also compensates for movement of the drone. Makes video much more stable.

Telemetry
This set is for working with the laptop.
The transmitter has to be soldered to the CX20 Drone

The Drone
This FPV system is going on is this. It comes with a fixed mount for the camera already. But I am adding the Gimbal system for versatility.
No comments:
Post a Comment
Please keep it clean. you are welcome to comment, Add and even post a different point of view.